Pro Tips to Improve Your Disc Golf Forehand!
This post on pro tips to help you improve your disc golf forehand, is the fifth post in a series designed to help you elevate your game. Watch the videos and reinforce the concepts through reading. Watch, read, practice, and improve!
What if I asked you, “Would you give just over 8 minutes of your time to significantly improve your disc golf forehand?”
Would you do it?
Can I answer for you?
Of course you would!
And that’s exactly what we are talking about today.
Nate Sexton, one of the best forehand players to ever play, gives a clinic on how he throws his forehand.
Well, if he is throwing it that way, then perhaps we should as well.
And if we’re being honest with ourselves, it is going to take more than 8 minutes, right?
We should pause, process, practice, replay, and repeat. A lot.
But while we’re being honest, isn’t it completely, 100% worth it?
I think so.
The alternative might be sending an errant forehand way off line to smack a tree and go careening off into the netherlands of the woods.
Or, watching yet another forehand “turn and burn” and cut roll embarrassingly close to the location you just launched it from?
Or executing any of the countless other issues that occur when we throw forehands?
Yes, this is definitely worth the investment of time.
Sexton has us covered, soup to nuts, from grip, to reach-back, to follow through, with countless other nuggets to mine (that’s what I’m here for) throughout.
So let’s get going shall we?
Let’s take the time to watch one of the very best in the world teach us his craft, so that we can reap the rewards with consistent, effective, and, perhaps, deadly forehands, that will drop scores from our game and make us far more complete disc golfers!
This time, in this post, and unlike the previous posts in this series on accuracy, upshots, grip, and playing disc golf in bad weather, we’re going to watch first and review afterwards.
Let me know in the comments if you like it better this way or the other.
Key Sidearm (Forehand) Pointers!
Now that you’ve watched, let’s go over some of the key points starting with warming up!!
Always Warm Up Before Throwing Big Forehands!
One important thing that he mentioned in the middle is the importance of warming up before throwing big forehands!
You can do this by gradually increasing distances or playing catch (also from short distances).
In general, Sexton mentions, the forehand can be more taxing on your arm/body so warming your arm up is of the utmost importance!
You don’t want to injure it and be unable to use these newer techniques we’re learning today, so warm up!
Now let’s look at Sexton’s thoughts on the forehand grip!
Find A Sidearm Grip That Works For You!
The video starts right out by getting into the grip that Sexton uses.
He mentions, however, that while the disc he’s using (The Firebird) is the same size/dimensions as your Firebird, his hand is NOT the same size/dimensions as theirs (or yours or mine!).
All that means is: Just because he’s using that grip (and is one of the best in the world) it DOESN’T mean it’s the perfect grip for you (probably worth a try though!).
In the end, Sexton leaves us with 2 keys for forehand grip.
Sexton Forehand Grip Key #1 – Have 2 fingers be on the rim.
Sexton Forehand Grip Key #2 – Leave NO Space between the disc and your hand (at the base of your thumb and pointer finger. (This provides more consistency and less wobble.)).
Once you do that, it’s up to you to find a method that’s comfortable for you.
“Comfort above all else,” Sexton reminds us.
Then, at about the 1:30 mark, Sexton moves to footwork.
 Use Proper Footwork To Maximize Your Forehand!
Nate begins by telling us, with a cheeky grin, that he uses “The World Famous Sexton Hop” for his footwork.
Here’s the “Sexton Hop” Sequence for RHFH (opposite for LHFH):
- Left Foot Step
- Right Foot Step
- Right Foot Hop
- Go (Step forward with Left Foot and Throw)
For anyone that plays baseball, he likens this footwork to what an outfielder does in baseball when throwing it back into the infield.
In baseball, this would be called the “crow hop.”
The basic premise is that you, in his words, “turn your hips sideways to your target, temporarily, while you load the shot, and then you’ve got to snap your hips out of it, and then come through back to square to get big power.”
He goes on to point out that others use different footwork before moving on to the ever-important forehand reach back.
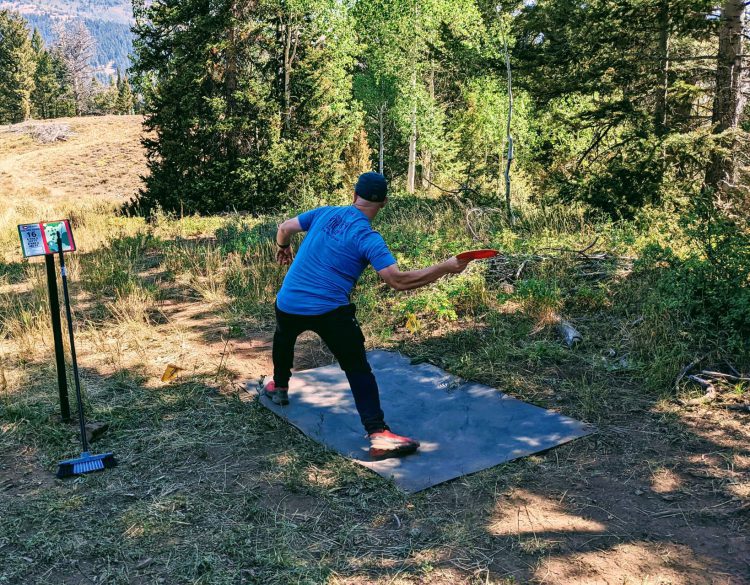
Use Proper Forehand Reach-Back!
Sexton starts out the section on reach-back (at 2:45) by discussing the wrist action and contrasting it to the backhand.
“The backhand is thrown with a passive wrist. A locked wrist. The forehand is an active wrist throw.”
Another contrast he points out is the reach back.
In the backhand you typically do a long, straight reach back.
Not so with the forehand.
“The forehand reach back is NOT linear,” he tells us.
The elbow is far from the body in the reach back with your elbow bent and the face of the disc looking at the back of your head (at about head height).
At 3:20 he addresses when you should be tucking your elbow into the body.
When you get into “the hit of the throw” pin the elbow to the side of your body (when throwing hyzer or flat) for as long as you can. But not for the reach back or follow through.
“When I want to get into the hit of the throw, I am going to pin the elbow to the side…Bring it in close, snap the hips, snap the wrist forward through, and then on the follow through again, obviously the elbow is coming off…“
Then, at about 3:55, Sexton gets right into controlling angle on the forehand shots.
How to Control Angles with the Forehand Throw!
To work on controlling angles, Sexton points out 3 levers you can use to do so with the forehand shot. Wrist, elbow and hip.
He then translates for us and tells us how he uses these levers for hyzer and anhyzer shots.
For the wrist, he shows us how the wrist lever can set the disc on a hyzer (with the wrist pointing downward), flat, or anhyzer (wrist flexed up).
With the elbow, we see that you can use it to throw hyzer (disc swings below elbow) or anhyzer (elbow off the body and disc above the elbow joint).
And finally, he points out you can drop the inside hip to add more hyzer to your shot as well (You probably don’t want to do the opposite for the forehand anhyzer he shows).
Understanding these three levers, and practicing them a lot, will help you master your angle controls on any given forehand shot.
At this point, he is asked a question about warming up to prevent pain (which we covered partly at the beginning when we talked about warming up slowly and gradually.)
But he also made sure to stress the importance of using the snap of the wrist so you are not cranking your arm and so you can “work smarter not harder.”
Next, at about the 5:25 mark, we get into disc selection for learning proper forehand technique.
Choosing the Right Disc for Forehand Shots
One key to making good throws, is selecting the best discs for forehand throws.
Sexton is a big proponent for learning to throw forehand by using understable discs because it “let’s you control angles.”
He continues.
“You gotta be able to work some angles with the flippy stuff, and you’ll be thankful for it when you get on a really tight woods course, or you have a tailwind, and you need to generate power across some different, more subtle lines, that aren’t just a wide open field hyzer.”
Preventing the “Turn and Burn” Forehand
At the end of the video, Sexton is asked if he has “any last tips for beginner sidearm?”
The first thing that comes to mind for him is wrist snap.
“Just to reiterate, the wrist speed is so important.”
Then, he goes onto a point regarding the wrist action that he didn’t necessarily touch upon earlier.
“The main thing that people do wrong is roll the wrist [too early] through as if they were throwing a football… [with the] fingers pointing down in the follow through…”
“With a forehand hyzer…you need to keep the palm up for as long as possible…very late in the follow through, sure, your hand will roll over…”
Essentially though, Sexton tells us to keep that wrist up until that disc is a good ways out of our hands.
This will ensure we’re not turning over to quickly and “turning and burning” those wobbly forehands.
His final bit of wisdom in this video is a healthy dose of logic.
“The forehand you really need to learn,” he tells us, “is the hyzer because then you have consistent right moving, right skipping shots (for RHFH), and that’s what’s going to save you 3 strokes a round next month…”
 Forehand Tips from Ricky Wysocki
Now we go from one legend to another.
In the next video we see a young Ricky Wysocki (circa 2017).
In the video below, Ricky takes questions during a clinic and in it, he pretty much reaffirms so much of what we just went over in Nate Sexton’s video.
Ricky goes over the proper reach back that Sexton talked about.
He also talks about the grip (and leaving no space between the disc and the hand).
There’s the importance of the wrist snap (vs. “arming the disc”) for power and less wobble.
He also discusses why we turn our forehands over (unknowingly rolling wrist or arm over before releasing the wrist).
Wysocki then talks about lining up his shot by lining up his feet.
Weight Shift While Throwing Forehands
At about 6:35, a gentleman mentions that his timing gets way out of sync if he does anything more than one step. He then proceeds to ask Wysocki about his run up for forehand.
It’s here that Ricky waxes a little about the importance of weight shift in forehand (but also backhand and sports in general).
I recommend watching it, as it really hammers home the importance of timing as it pertains to this weight shift.
“You really just want to keep your weight back (on your back foot) until your arm’s coming through”
In a related question, another person asks him about whether or not we should be twisting at the hips.
In essence, he tells us “no.”
If we are twisting at the hips we’re introducing so many new angles/directions that the disc could fly off on.
Instead, he instructs, think of it more of a lateral, side to side, movement of the hips.
Have the hips shifting towards the intended line you want to throw on.
Improve Forehand Through Trial and Error Practice
One final message that Ricky imparts throughout the video is the importance of trying these things out in order to improve your disc golf forehand. This applies for both distance throws and approach shots.
He tells us what we already know, but it bears repeating.
We’re going to get better at these techniques by trial and error, and by practicing and adjusting.
Before long, he tells us, it’ll become second nature.
Give the video a look and have Sexton’s points reaffirmed and learn a few new ideas as well!
Improve Your Disc Golf Forehand – In Summary
There you have it! Those are some tips from some of the very best in the game on how to improve your disc golf forehand and get more distance.
To start, we watched Nate Sexton give a clinic of sorts on his best tips for the forehand.
Here’s what he gave us:
- Always warm up!
- Grip – Have two fingers on the rim and leave no space between the disc and your hand. In the end, find what’s comfortable for you!
- Footwork – Try the Sexton Hop!
- Reach Back – Remember that it’s non-linear and comes up behind your head (see video).
- Elbow Tuck – For the hit of the throw, tuck your elbow into your side for throwing hyzer or flat.
- Angle Control – Use your wrist, elbow and hip to control angles.
- Wrist – Remember that forehand has an active wrist snap (instead of “arming” the disc).
- Palm Up – Keep your palm up until after you release (this will help you prevent “turn and burn”)
- Understable Practice – Practice forehands with flippy, understable discs. This will help you control your angles better.
Sexton gave us a lot and it’s all quite valuable. Wysocki, who’s not too shabby with his forehand himself, reinforced a lot of Sexton’s advice and added a few tidbits of his own.
Here’s what Wysocki had to say:
- Weight shift – Shift your weight from your back foot to your front foot as you are coming through.
- Hips – Instead of rotating the hips and introducing new angles to your throw think of your hip movement as a lateral, side to side movement towards your intended line.
- Practice – Go out and try your shots and learn through trial and error!
As I said before, there is certainly a lot to take in. But as we also said, it’s absolutely worth the time investment to be learning from some of the best in the world.
Comment Below!
I hope those tips from Sexton and Wysocki have helped you improve your disc golf forehand.
They certainly have for me!
Let us know in the comments below if there were any tips that resonated with you.
Were there any that were new to you?
Do you have any tips that you use that wasn’t mentioned in the videos?
Did you prefer this format (watch first, review second)? Or do you like it the other way around?
Anything you still want to know about?
Let us know all this and more!
In the meantime, keep working on your game everyone and reap the rewards on the course!
Mister Disc
Mister Disc is a teacher/writer as well as an avid disc golfer. He is the creator of his own newer site DiscGolfAround.com. Subscribe to it and/or follow him on his newly formed instagram account (@discgolfaround) and watch as he chases his dream of building courses in his own back yard, teaching what he learns, and traveling around the world playing the game he loves.