Best Fairway Drivers 2026

Every year we like to look at the best sellers and the highest rated disc golf molds to see what it hot. We present this information in a series of blogs. This week we’re doing it again. We’ve already covered the top putters and midrange discs. Now we’ll take a mid-year look at the best fairway drivers 2026. Let’s start with the best fairway drivers, often called control drivers, for last year
Why Fairway Drivers
Fairway drivers fit the gap between midrange discs and distance drivers. With a more narrow rim than distance drivers, many people with small hand prefer them. They are often referred to as ‘control drivers’ because they are easier to control the shape than distance drivers.
Control drivers typically range from speed 6 to speed 9. Like all discs, they come in a variety of stabilities. They can be used to fight through thick woods or thrown on an open fairway. Approach shots are also in the control driver wheelhouse. They will skip farther than mids or putters, so that needs to be taken into consideration.
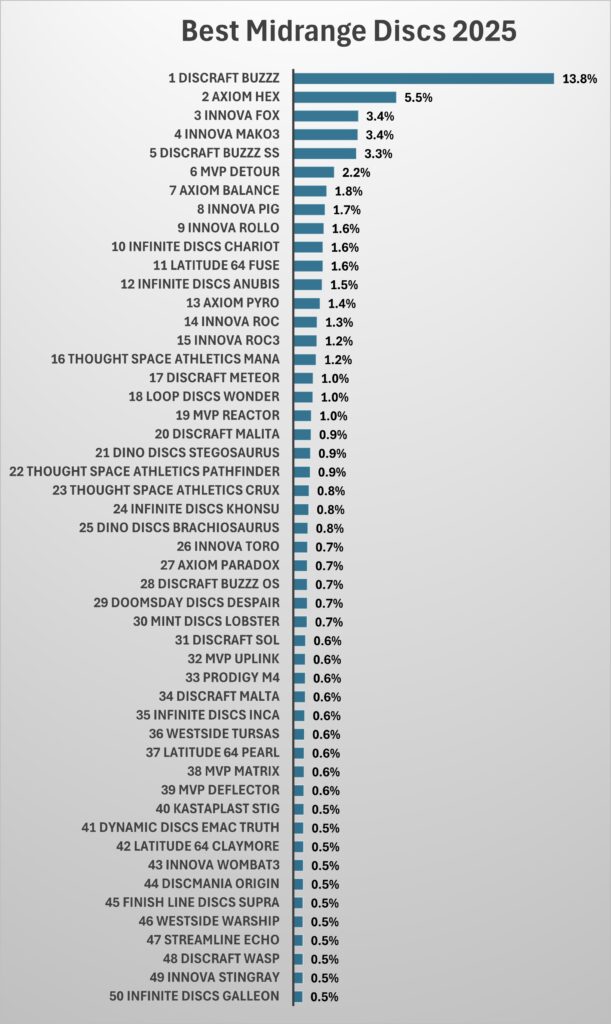
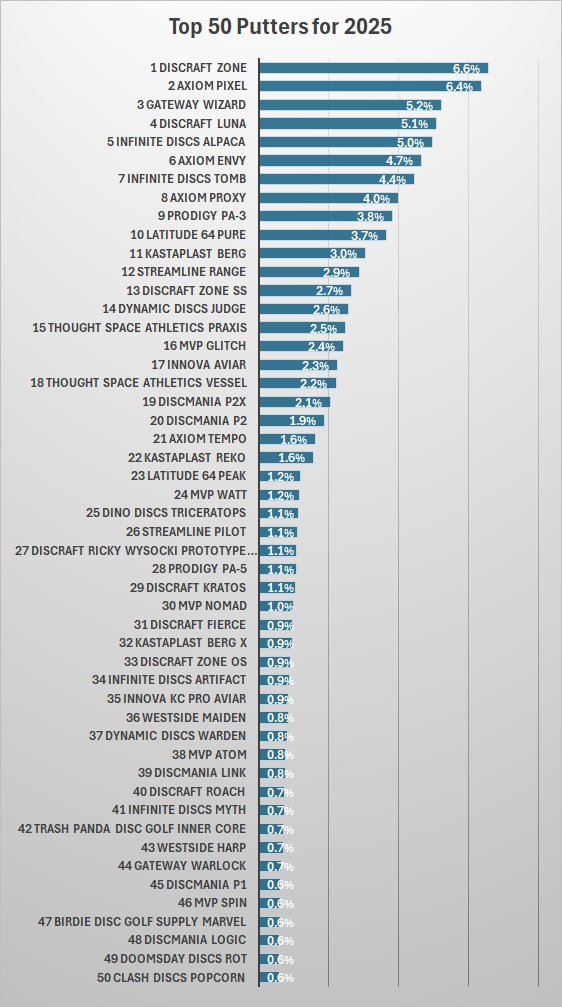
Best Fairway Drivers 2025

My go-to fairway driver, the Sphinx, took the number one spot! I recommend everyone give the Sphinx a try. If you are a more advanced player, look for more overstable plastics, like glow metal flake C-Blend or Halo S-Blend. Or a more flippy plastic if you’re looking for a roller or big turnover shot.
The Crave moved up several spots to take second place. It is a straight-flying mold that works great with a backhand or forehand throw. For MVP fans, the Crave is compared to a seasoned Servo.
Completing the podium is the Innova Teebird. Most of us would consider the Teebird an ‘old-school’ disc. It was approved in 1999, and has been popular since it was released. It is a speed 7 disc that has a bit of overstability to give it a reliable fade.
The Doomsday Discs Chemtrail made the list last year. It was released in 2024, so it had its first full year of sales in 2025. It proved to be a popular mold!
The Latitude 64 River moved up a bit from the previous year, breaking into the top five.
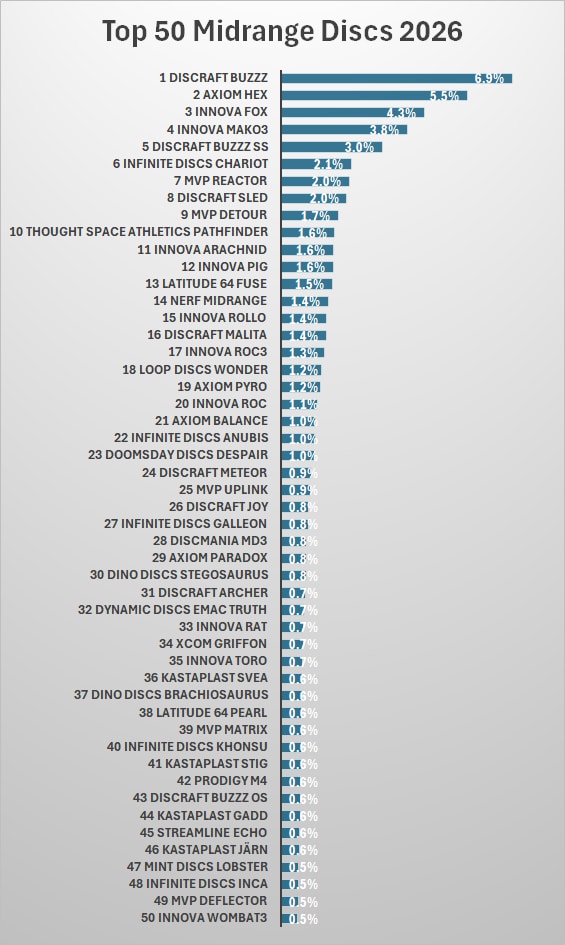
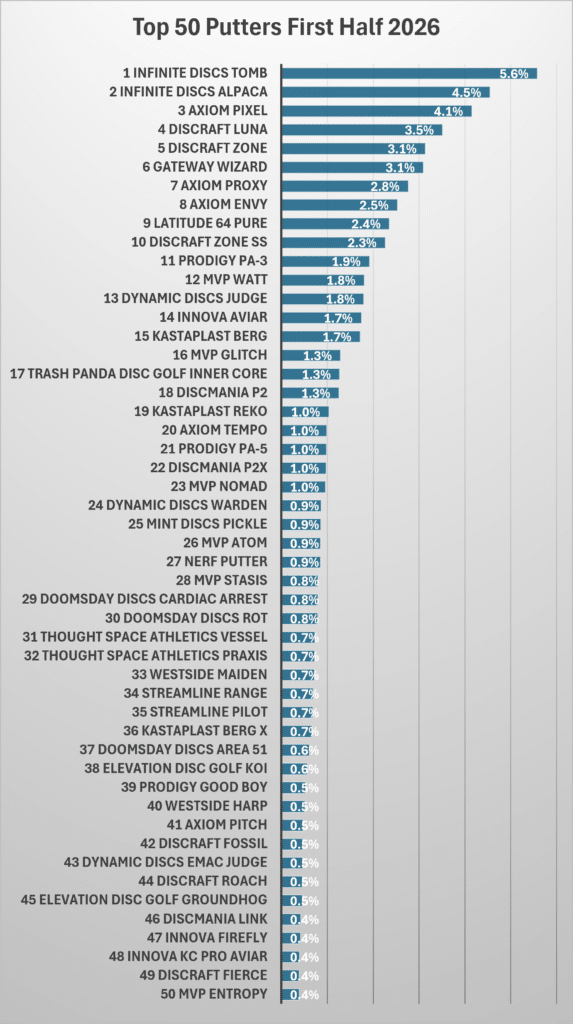
Best Fairway Drivers 2026
The Axiom Bokeh will have its first full year of sales this year, and it is off to a great start. The Bokeh takes the top spot so far, with about 4% of all fairway driver sales.
Another Axiom mold took second place. The Crave has a decade head start over Bokeh, and has been a popular fairway driver, took the bridesmaid position last year, too.
The Sphinx slipped a little, moving from first place last year, to third this year. Still a good showing for the understable fairway driver from Infinite Discs.
A perennial favorite, the Innova TeeBird, comes in fourth so far this year. It will likely be on the list forever.
Doomsday Discs has their Chemtrail, which made the top five list for 2026. It has turn, but not too much, and a mild fade. The Chemtrail can be found in the bags of newer players and veterans alike.

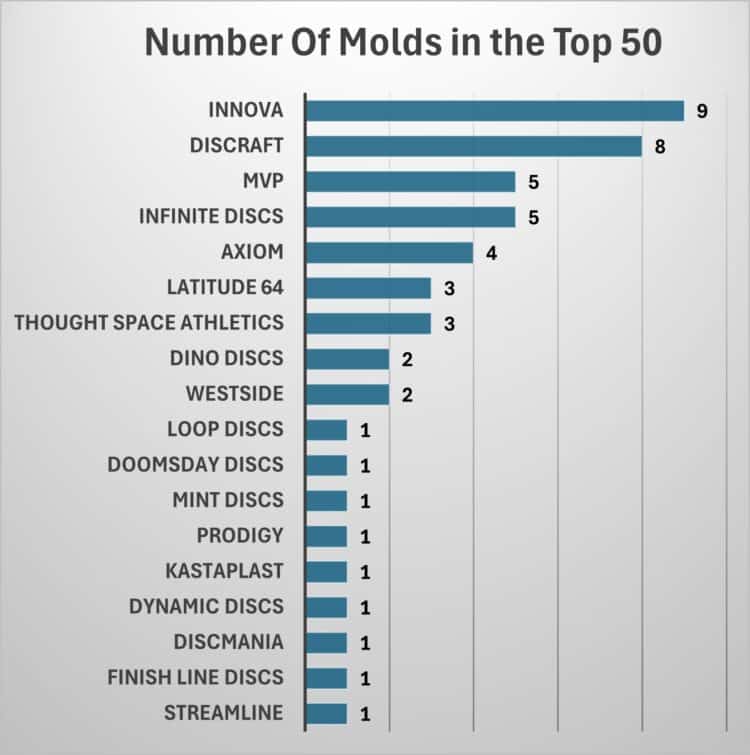
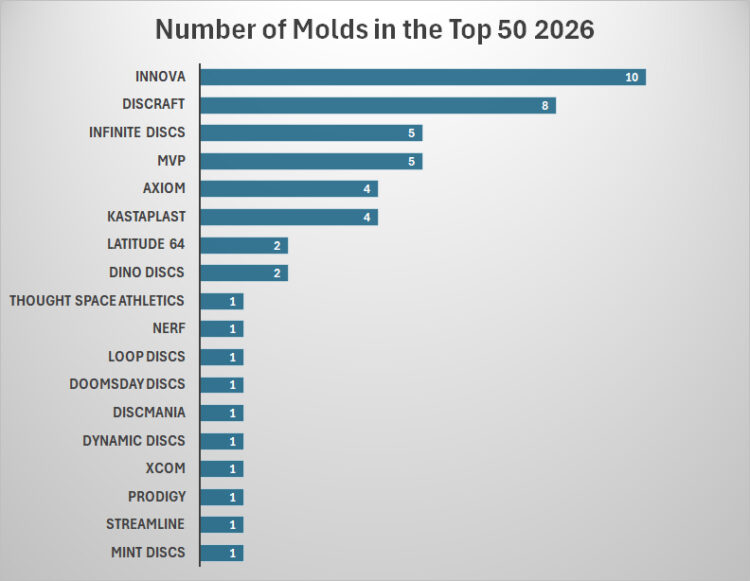
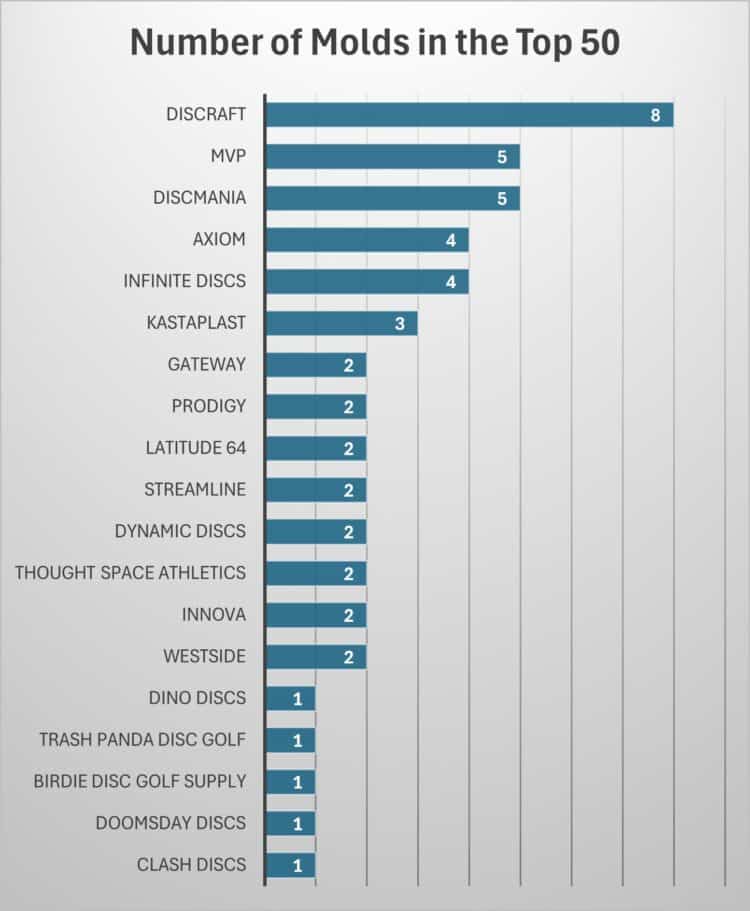
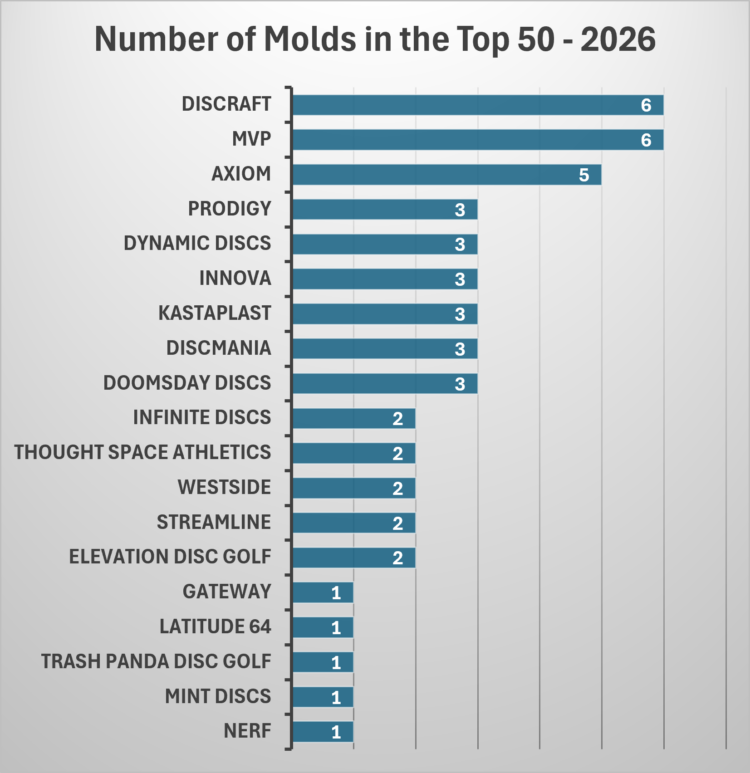
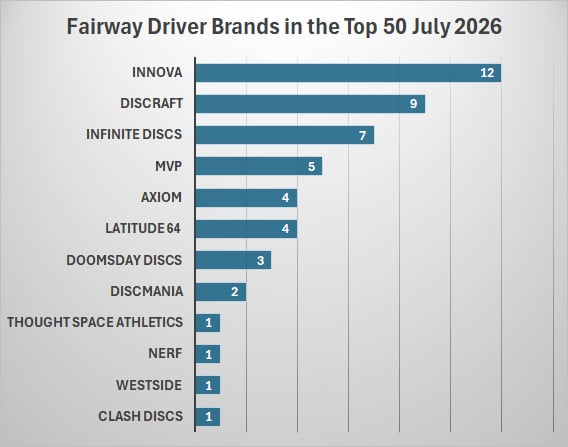
Brands With the Most Molds in the Top 50 July 2026
Old-school disc golf brands Innova and Discraft top the list. The two companies are responsible for a little under half of all fairway drivers sold so far this year. The third podium member is Infinite Discs. While Infinite is available for sale at disc golf retailers around the world, a majority of the sales of our own brand comes from our own website.
Highest Rated Disc Golf Fairway Drivers
One of the biggest perks of shopping on the Infinite Discs website is the ability to browse real player reviews and see how each disc is rated before you buy. As more players share their experiences, those ratings become an incredibly useful snapshot of how the disc golf community feels about specific molds. The rating system also ties into the Infinite Rewards program, which lets you earn points for leaving reviews or making purchases. If you haven’t explored Infinite Rewards yet, it’s worth a look (click HERE). Your feedback not only earns rewards but also helps strengthen our growing library of disc reviews.

With that in mind, we decided to dig into several disc categories to highlight the molds that rise to the top. With our ratings system, we weight molds that have more reviews heavier than those with fewer reviews. Let’s kick things off with the highest‑rated disc golf fairway drivers of all time.
Highest Rated Fairway Drivers

The Firebird and Teebird tied for first place with 4.74 stars out of 5. The Firebird is a reliable overstable driver that can still be thrown by newer players, because of its lower speed. It is excellent for headwind shots and spike hyzers.
The third highest rated control driver is the Thunderbird. It is like a faster Teebird. Less overstable than the Firebird, you can get more distance with the Thunderbird.
You could bag all three of these molds and cover a big variety of shots.
Click to see the highest rated fairway drivers.
Highest Rated Very Overstable Fairway Drivers
 The Innova Firebird takes first, of course, with the Dynamic Discs Felon coming in second place. The popular Felon was created to battle the Kansas winds, and it does a great job. If you’re looking for a disc that will not turn and give you a beefy fade, check out the Felon in Lucid plastic.
The Goliath Discs Chainbreaker is the third highest rated very overstable fairway driver. It lives up to its name, and will not back down from the fiercest wind on its way to the chains.
Click to see the highest rated very overstable fairway drivers.
Highest Rated Overstable Fairway Drivers
 Obviously, the Champion Teebird and Champion Thunderbird will podium with this category, since they were the highest rated overall. Taking third place is the Discraft Undertaker. The Undertaker has a little more turn than the top two discs, but still has the reliable fade. The Undertaker will be celebrating its tenth birthday this year, having been released in 2016.
Click to see the highest rated overstable fairway drivers.
Highest Rated Understable Fairway Drivers
 People are not only buying a lot of Sphinx’s, they are liking them a lot! The flippy I-Blend Sphinx is the highest rated understable fairway driver with 4.87 out of 5 stars. I have several Sphinx in I-Blend (and other plastic types for different situations.)
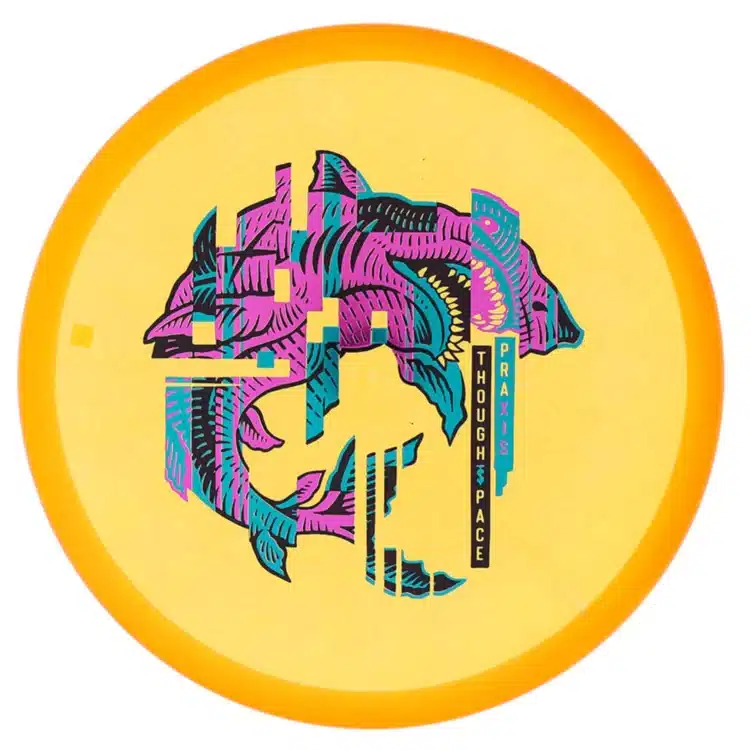
Taking second place is the Thought Space Athletics Mantra. This popular mold has a good amount of turn and very little fade. It flies straight for newer players, and a great shapable tool for more experienced players.
Rounding out the top three is the Axiom Insanity. It was Axiom’s first distance/control driver. Like the Mantra, the Insanity works fine for an intermediate player, giving them a straight flight. Advanced players will unlock its understability, and can use the Insanity for turnover shots.
Click to see the highest rated understable fairway drivers.
Let us know what you think, and you could win a gift card!
Those are our lists of the top fairway drivers using sales and ratings data. Now we want to hear from YOU!
What is your favorite/go-to fairway driver?
We’ll pick a few random commenters and give them an Infinite Discs gift card!
See all of our current giveaways HERE.